In this lesson, you’re going to learn the exact steps to take to install Oracle on your Mac computer.
This guide includes:
- step-by-step instructions on downloading and setting up the required software
- screenshots at each stage
- explanations of the configurations you need to set (such as connecting to the database)
So if you want to set up Oracle on your Mac computer, you’ll love this guide.
Let’s get right into it.
Overall Process
Installing an Oracle database on a Mac computer is a bit different from installing it on a Windows or Linux computer.
Oracle doesn’t support running an Oracle database directly on a Mac computer. You can’t install Oracle Express, for example, in the same way, that you can on a Windows computer.
The good news is that you can use a Virtual Machine. To get set up with Oracle on your Mac, the general process is shown below.
Note: An alternative to using a Virtual Machine is using Docker. I believe using Docker is a simpler process and seems to less resource-intensive than a Virtual Machine. I’ve documented the entire process here if you want to try that method instead: How to Set Up a Database on Docker.
Let’s take a look at the requirements, and then get into the steps.
Requirements for Oracle VM on a Mac
So, what do you need to be able to run Oracle using a VM on a Mac?
The requirements for running a virtual machine are listed on Oracle’s page here (last updated 20 Jun 2019), and are shown below:
- At least 2GB RAM. Default VM is 1G RAM, for better performance increase.
- At least 15GB of free space
-
2GHz processor (a lesser processor will be acceptable but slower)
-
Mozilla Firefox 2.0 or higher, Internet Explorer 7 or higher, Safari 3.0 and higher, or Google Chrome 1.0 or higher
- Admin privileges on your computer
My current Mac is a 2018 MacBook Pro with 8GB of RAM and a 256GB hard drive, which runs the VM pretty well.
On my previous MacBook Air (2015, 4GB RAM), it ran pretty slowly, because the 4GB RAM is split with 2GB for the VM and 2 GB for the Mac OS, bringing both systems to a crawl. MacBook Airs are not designed to be able to run intensive programs such as VMs.
If you really want to use Oracle on a Mac, but don’t quite meet the requirements, you can use Oracle Live SQL, which is a web-based Oracle database.
Assuming you want to install Oracle on your Mac, let’s look at the steps.
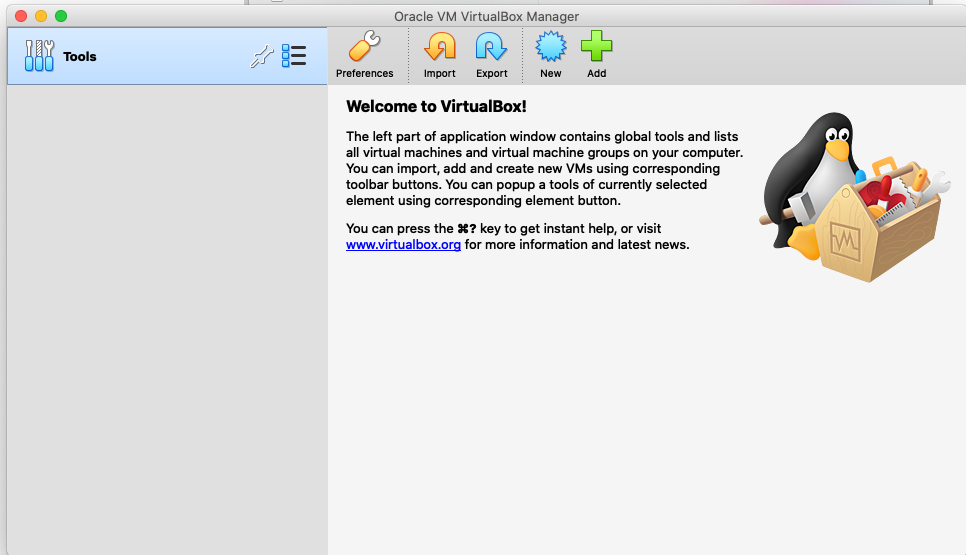
Step 1: Get VirtualBox
The first step to getting Oracle on your Mac is to download a program called VirtualBox. This program allows you to run virtual machines, which are self-contained operating systems. It will let you run a Windows or Linux operating system inside your Mac.
I suggest VirtualBox because it’s free, and Oracle provides a ready-made file that you can use with it. One alternative is Parallels, which I explain at the end of this guide.
To download VirtualBox:
Step 1A: Go to the VirtualBox website: https://www.virtualbox.org/wiki/Downloads (opens in new tab).
The current version is shown at the top of the page (currently it is 6.2.6).
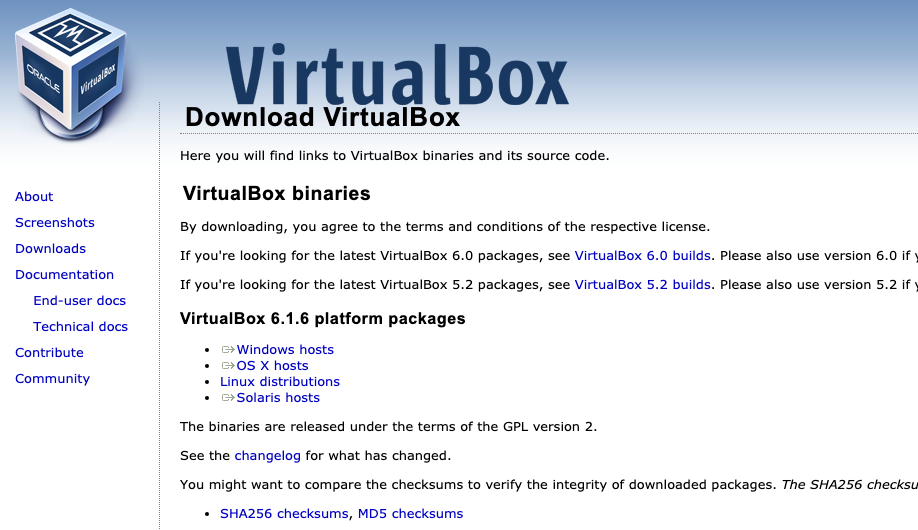 Step 1B: Click on “OS X Hosts”. This is a direct link to a .dmg file, which is the installer file for Mac.
The file will start downloading. It’s approximately 122 MB.

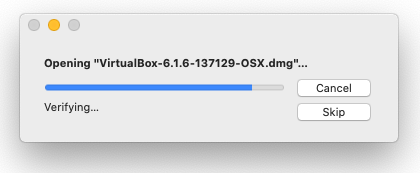
Step 1C: Once the file is downloaded, open it.
Step 1D: Double click the VirtualBox.pkg icon in the window that appears.

Step 1E: Click Continue if a message appears about installing the package.

Step 1F: Click Continue on the welcome screen.

The installer will tell you how much space VirtualBox will take up (approx 251.8 MB).
Step 1G: Click Install.

Step 1H: Enter your password if prompted.

The program will now be installed.

Step 1I: Once completed, it will inform you the installation was successful.

Step 1J: Click Close, and move the installer to the trash.
Installation Failed?
Did you get an error saying the installation had failed for VirtualBox VM?
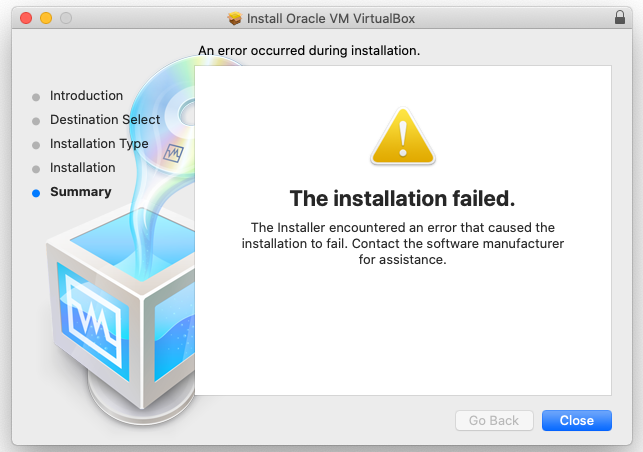
The installation failed.
The Installer encountered an error that caused the installation to fail. Contact the software manufacturer for assistance.
I got this error when attempting to install VirtualBox on 10 May 2020, running macOS Catalina 10.15.4.
How can you resolve this?
These are the steps I followed (thanks to Daniel Meechan’s article here):
Follow the steps from 1D to 1G above, stopping when you get to the screen with the “Change Install Location” and “Install” buttons. Don’t click Install.
Open System Preferences from the Apple menu.

Click on Security & Privacy (second row, far right).
Click on the General tab.

You should see a greyed-out message at the bottom of the window saying “System software from developer “Oracle America Inc.” was blocked from loading.
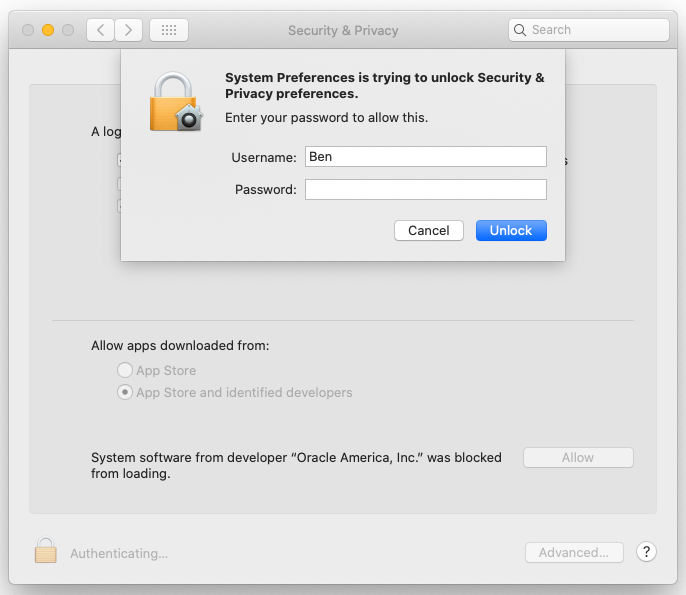
Click the padlock icon on the bottom left of the window to unlock this window.
Enter your password and click OK.

The disabled text and buttons should now be enabled.
Click Allow.
Enter your password again.
Now, return to the VirtualBox installer and click Install.
Resume the steps above from 1H. The installation should now be successful.
Step 2: Download the Oracle Developer VM
Now you’ve got VirtualBox installed, you need to download the file that contains the Oracle database. This is the virtual machine file and is provided by Oracle.
It’s called the “Oracle Developer VM” or “Oracle Developer Day VM”, as it was created for developers but it has expanded since then.
To download this file:
Step 2A: Visit the Oracle Developer Day download page here (last updated 20 June 2019).

This page lists the versions of software it comes with. At the time of writing, this is Oracle Linux 7 with Oracle Database 19.3.
Step 2B: Scroll to the bottom of the page and click the Oracle DB Develop VM link.

Step 2C: On the popup that appears, check the box to accept the license agreement, and click the green Download button.

Step 2D. You’ll be asked to log in to your Oracle account. If you have an account, enter your details. If you don’t have an account, you can create one. It’s easy and free.

Step 2E: Once you have logged in, the Developer Days VM file will start downloading. It has an “ova” extension.
![]()
This file is about 7GB so may take a while. I’ve had no issues downloading it with Chrome, but you may want to use a download manager if your connection isn’t very good.
Step 3: Set Up the Oracle VM
Now you have downloaded the Oracle VM file, it’s time to set it up.
Step 3A: Open VirtualBox. I usually do this by pressing Command + Space and typing in VirtualBox.
Step 3B: Click File, then click Import Appliance (or click the Import button at the top of the main screen). The Appliance to Import screen is displayed.
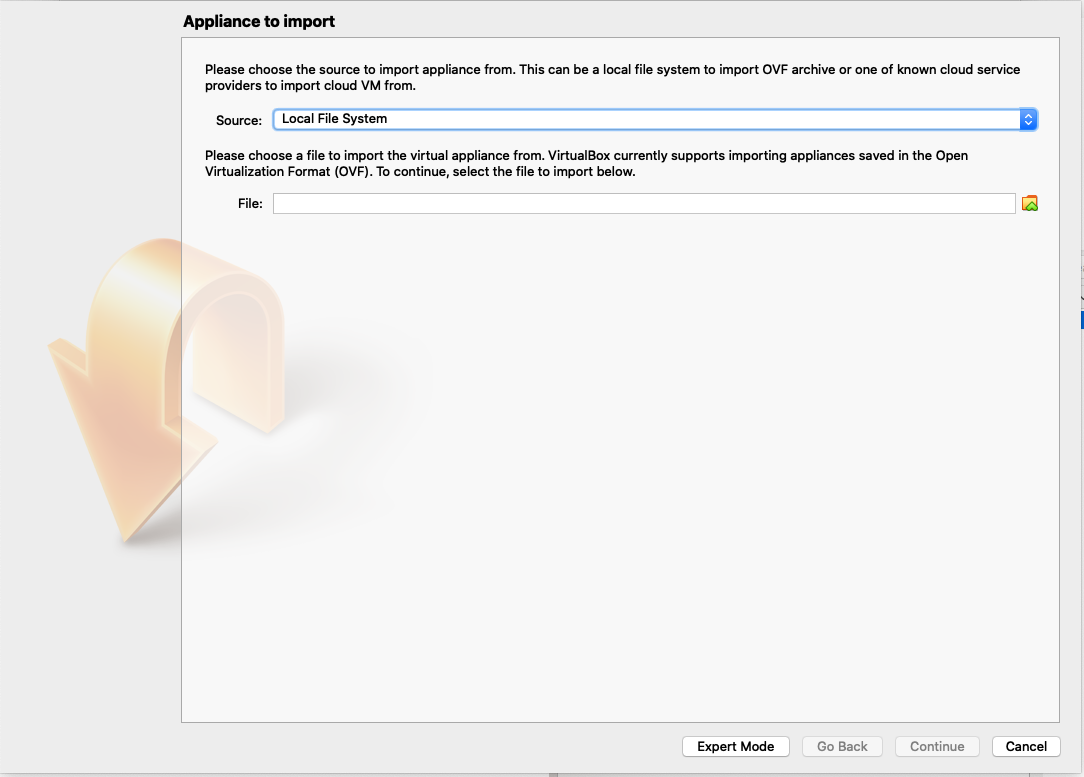
Step 3C: Click the Choose File button on the right of the textbox, which is the little yellow folder icon with the green arrow. (Leave the Source textbox as the default “Local File System”).
Step 3D: Select the DeveloperDays OVA file you have just downloaded, and click Open.
There’s no need to extract the file before opening it.

Step 3E: Click the Continue button on the main installer.

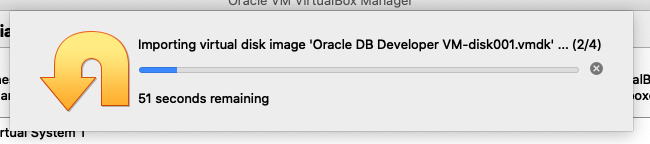
Step 3F: Click Import on the Application Settings page.

Step 3G: Click Agree on the popup that appears.

Step 3H: The import process will begin. This process took about 2 minutes for me.
Step 3I: Once the installer is finished, you should see “Oracle Developer Days (Powered Off)” on the left panel of the VirtualBox window.
This means the VM is installed but not running.

Step 4: Run the Oracle VM
Now the installation has finished, it’s time to run the Oracle VM.
Step 4A: To run the Virtual Machine, click once to select “Oracle DB Developer VM” and click the green Start arrow.
There will be a minute or so of a black screen with white text as the virtual machine loads, and a black screen.

A Linux desktop will appear, and a moment later a terminal window will appear:

The virtual machine is now ready to use.
A Note About Firewall and Port Forwarding
In previous versions of VirtualBox and this VM, we had to take extra steps to make the VM visible to the host (the Mac that you are running the VM on). We also had to set up port forwarding, which would allow us to enter in an IP address such as “localhost” on the Mac and have it forward to the Virtual Machine.
However, this configuration is already done in the latest version. So, these steps are no longer needed. Once the VM is running, as mentioned above, we can connect to it using SQL Developer (or another IDE).
I’ve removed these steps from the guide, but the comments below still refer to them.
Let’s continue!
Step 5: Test Using SQL Developer
The last step is to test this connection using SQL Developer.
Step 5A: Open SQL Developer on your mac. If you haven’t downloaded it, you can download it from the Oracle website.
Step 5B: Create a new connection by clicking on the green + icon.

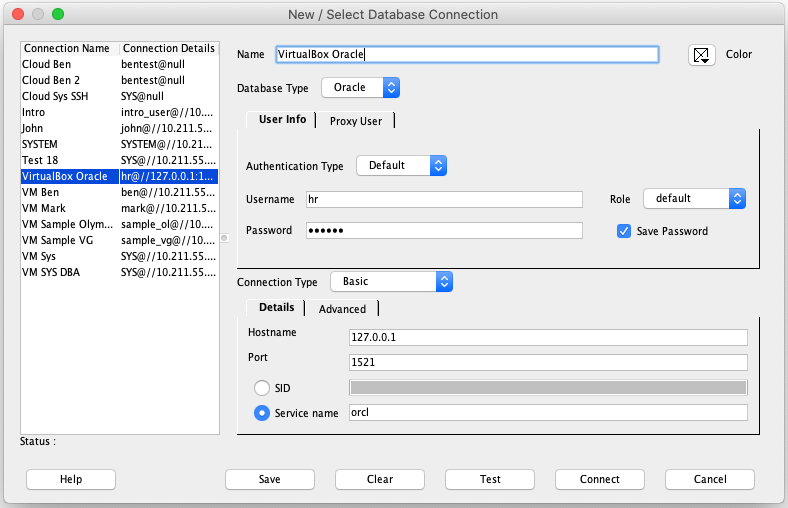
Step 5C: Enter these details for your connection:
- Name: whatever you like. A name such as “VirtualBox Oracle” is OK if you can’t think of anything.
- Username: hr
- Password: oracle
- Check Save Password if you don’t want to enter the password every time.
- Hostname: localhost
- Port: 1521
- Select “Service Name” instead of “SID”
- Service Name: orcl
- Connection Type: Basic
Your connection screen should look something like this:
Step 5D: Click “Test” to test the connection. The message should say “Success”, which means the connection has worked.
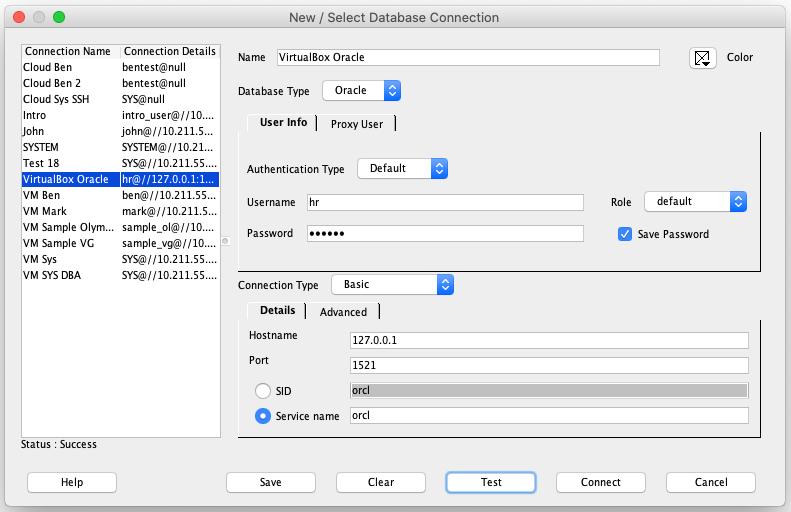
- If it says “Listener refused the connection with the following error: 12514”, then you likely have the Service Name incorrect.
- If it says “Listener refused the connection with the following error: 12505”, then you likely have selected SID instead of Service Name.
- If it says “Test failed: ORA0-1017: invalid username/password, logon denied”, then you likely have an incorrect username or password, or one of several other issues.
I’ve written more about resolving Oracle connection issues here.
Step 5E: Click Save to save your connection in the list.
Step 5F: Click Connect. After a moment, a new SQL worksheet window is opened on this new connection.

You can now run SQL queries on Oracle on your Mac. This will work for as long as you have the Virtual Machine running in the background.
To test this, you can run this query:
SELECT * FROM v$version;This will show the current version of the Oracle database.:

Your Mac can now access your Oracle database running on your virtual machine!
Shutting Down
Once you have finished with your Oracle SQL session, you can shut down your VM. To do this, go to Machine > ACPI Shutdown. The Virtual Machine will go back to a “Powered Off” when it’s done.
Alternative to VirtualBox: Use Parallels
One alternative to this process of using VirtualBox and the Oracle VM is to use Parallels. Parallels is a VM application, just like VirtualBox. The key differences are:
- It has a different VM file format, so you can’t use Oracle’s VM files.
- It’s a paid tool, unlike free VirtualBox.
- You can install your operating system on it, so you can run Windows 10 for example, instead of Oracle Linux. VirtualBox allows this as well.
- You can install your version of Oracle on there, such as Oracle Express or an earlier/later version of Oracle.
The steps are quite similar to setting up VirtualBox. To set up Parallels for an Oracle database on your Mac, the high-level steps are:
- Purchase and download Parallels for Mac (or use the free trial).
- Install Parallels.
- Set up a new Virtual Machine on Windows 10. I don’t know if you have to download the Windows 10 (or other Windows version) ISO file, or if Parallels can do that for you.
- Once the operating system is installed, download Oracle or Oracle Express from the Oracle website, inside your virtual machine.
- Install it on your virtual machine as though you’re running it on a Windows computer.
- Similarly, configure the port settings as you did for VirtualBox
- Connect to the virtual machine from SQL Developer on your Mac.
I’ve used Parallels in the past for this. The only reason I stopped was that my MacBook air didn’t have the specs to keep up with running a VM.